A guide on the resident email tool, and some FAQs.
The Resident Email Tool is a way to send bulk invites out to your residents with an email coming from HomeViews, rather than your inbox. It's simple to set up and monitor the success of each campaign.
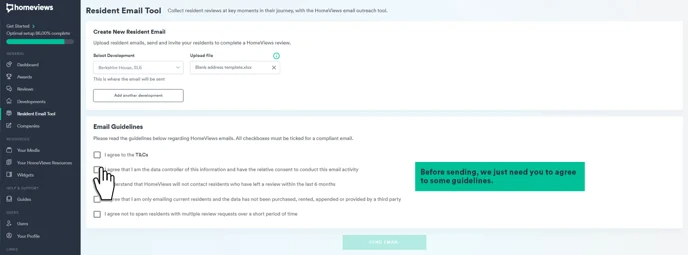
How to use the Resident Email Tool
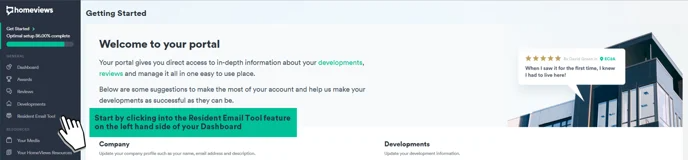
Log in to your portal here, and click on the Resident Email Tool feature on the left hand side of your Dashboard.
Select the type of template you wish to use. You can view the template before sending by clicking ‘See preview’.
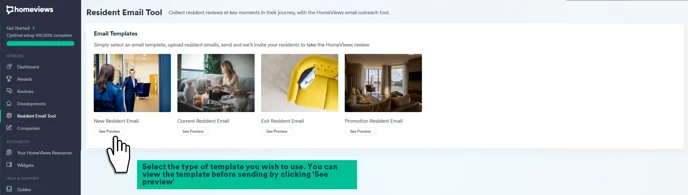
Note: The copies of the templates are currently unamendable. They have wording tailored to the type of resident, so can be used accordingly.
There are currently 4 types of templates being offered with the tool:
New Resident - this is for residents who have just moved in, that may want to share about the move-in process and how welcomed they have felt in the building.
Current Resident - this is for residents that have lived with you for over 6 months, that may want to share their overall experience with the building and staff.
Exit Resident - this is for residents that have just moved out, who may want to shout about how great their time was living in the building.
*Residents can leave their reviews up to a year after leaving the property, so long as they can provide their proof of previous tenancy during the verification steps.
4. Promotion Resident Email - this can be used for any resident. The copy here specifically mentions any promotion that is running when inviting them to write their reviews. This is the only template that currently mentions this.
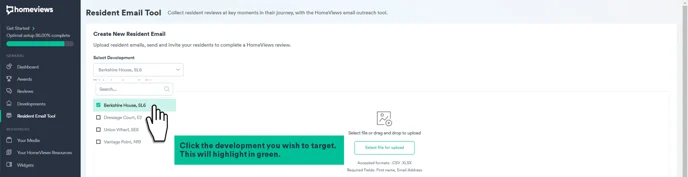
Select the dropdown and click the development you wish to target. This will highlight in green.
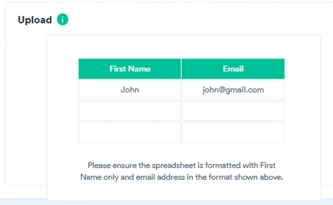
Prepare your address file with the required fields: first name and email address. It should look like this:
Click 'Select file to upload' or drag and drop your address file. You will know that the file has successfully uploaded as there is no red ring around ‘Uploaded File’.
Got an error message? Click here to troubleshoot your error.
Read and check the email guidelines, and click 'Send email'.
What does the "Sent Emails" table show?
Once you've sent a batch of emails out to your residents, you will see a breakdown of the Open Rate, Click Through Rate (CTR) and Completion rate of each campaign.

The "Type" shows the email template you selected in that instance, where you had the option to choose from "New Resident Email", "Current Resident Email", "Exit Resident Email" and "Promotion Email".
The "Open rate" displays what percentage of the people you sent an email to opened the email they received. Please note, due to recent email privacy changes, open rates may not reflect how many of your recipients actually opened your email.
The "CTR" or the "Click Through Rate" displays the percentage of people who clicked the link to leave a review in the email.
The "Completion" rate displays the percentage of people who received the email who went on to complete the review form and press "Submit". This does not mean that the reviews were published, this just counts reviews that were submitted. The number may differ because not all reviews that are submitted are published straightaway; they have to go through moderation, may go into Partner Preview or be sent back to the reviewer for amending.
What if I have a promotion attached to a development?
You can still use Resident Outreach, in fact an email can be a good way to support a campaign.
Currently the Resident Outreach email will not mention there is an incentive attached to your development, however when a resident clicks on the link they will be taken to the review form for their specific development and will immediately be able to see there is an incentive for completing the form and it will also display any additional survey questions attached to that development.
How often can I send Resident Email Tool requests?
You can use the Resident Email Tool as often as you like. The more reviews you collect means the greater chance to increase your star rating, win awards and feature in the popular content on the HomeViews site. It also increases the confidence and interest from prospective residents visiting your page plus more data and insights to learn from your residents.
However, there are two things to take note of:
- Residents can only leave one review every 6 months. If you upload an email address for a resident who has left a review within the last 6 months, don’t worry, we will not send an email request to them. For example, if you upload a spreadsheet with 20 email addresses of residents and 2 of these email addresses have left a review on the HomeViews site within the last 6 months, when you press "Send", our database will do a quick scan and find that 2 email addresses have left a review within 6 months and will not send them an email; the other 18 emails will send.
- You can send multiple requests to email addresses, but to stop spam, you have to wait at least 14 days to send another email to the same email address. If you try to send multiple emails to an email address within a 14 day period, we only send one email during that period. For example, if I send an email to joeblogs@example.com and then upload his email address again to try and send another email within 14 days, when I press "Send" for the second time, our database on a quick scan will see that you sent an email to that email address within 14 days and will not send another email. On day 15, you can send an email to joeblogs@example.com in the Resident Email Tool.
Is the Resident Email Tool GDPR compliant?
Yes. In using this feature, you are the data controller and are responsible for having the necessary consent to email your residents to ask them to leave a review. HomeViews is the data processor and as such we do not store any of the information you have uploaded. We are simply the tool for you to conduct outreach to your residents.
You can find the full terms of use here.
If I use the resident email tool, where is the data I submit being stored?
HomeViews is the data processor not the data controller, which means that all emails submitted cannot be seen or controlled by us at HomeViews.
Data is stored within our infrastructure hosted within the United Kingdom on a 3rd party cloud provider. Personally Identifiable Information (PII) will be stored for the purposes of the Resident Email Tool in the following ways:
-
Name and email address will be stored in the uploaded file for up to 48 hours or on completion of processing of the file for sending email requests, whichever occurs first.
-
Email addresses will be stored in our database for 14 days to provide spam protection services. Following this email address data stored for this purpose will be anonymised.
-
Email addresses will be stored in our database until deletion is requested by the user if they choose to opt out of the Resident Email Tool. This is to fulfil the obligation requested by the user to prevent contact.
-
Email addresses will be stored in data backups in respect of points 1-3 in line with our standard business contractual requirements. This is to fulfil audit and compliance requirements along with disaster recovery operations.
-
Email addresses will be stored by our sub-processor who provides email sending and delivery services. This data will be retained for 30 days by them and will then be pseudonymised and stored for up to a year in for security, fraud detection, anti-abuse and network protection purposes.
What do the error messages on the Resident Email Tool mean?
When error message displays: “First Name / Email column could not be found."
This means that our system could not find a column labelled "First Name" and/or a column labelled "Email" in the spreadsheet you uploaded. These must be an exact match.
Please check that cell A1 in your spreadsheet is labelled "First Name" and cell B1 in your spreadsheet is labelled "Email".
If you continue to get this error after you have made this change, please email your account manager who will be able to look into this error.
When error message displays: “There were no records in the file."
This means that you do have a column labelled "First Name" in cell A1 and a column labelled "Email" in cell A2, but you have no data beneath these columns, i.e. there are no first names or email addresses to send an email to.
To fix this, check your spreadsheet has the first names listed underneath the "First Name" column and email addresses listed underneath the "Email" column.
If you continue to get this error after you have made this change, please email your account manager who will be able to look into this error.
When error message displays: “Instances of invalid emails" or “Instances of invalid first names"
This means that our system has found invalid characters in the column labelled "First Name" or invalid emails in the column labelled "Email".
Invalid characters means that you may have numbers or symbols (e.g. "!" or "$") in the First Name column where we were only expecting letters. Please check the column of first names and remove any special characters, such that it only contains letters.
Invalid emails means that you have email addresses in the Email column that don't meet our criteria of a valid email, such as do not contain ".com" or ".co.uk" or ".io" at the end or do not include an "@" within the email that we would expect to see. Please check the columns of emails to make sure they adhere to standard email format. If there is an email format that you would expect us to accept that maybe falls out of a "standard" email format, then please let your account manager know and we can look into this error.
Once you have made any changes to your spreadsheet, please re-upload. If you continue to get this error, please email your account manager who will be able to look into it.
When error message displays: “File {name} is too large to be uploaded, must be smaller than 4MB."
This means that the spreadsheet you have uploaded is too large. This likely means that you may have other tabs in the spreadsheet (please note, there should only be one tab with first names and email addresses) or perhaps you have an image somewhere in the file.
To fix this issue, please check there are only two columns of information. To be sure, you can delete all the columns that are not "First Name" and "Email" and delete all empty rows after you resident information.
Once you have made any changes to your spreadsheet, please re-upload. If you continue to get this error, please email your account manager who will be able to look into it.
When error message displays: “Email limit exceeded. Must be below 10,000 emails."
This means that the spreadsheet you have uploaded is too large for us to process in one go. Our system checks to see how many rows have information in your spreadsheet and if you exceed 10,000 rows then this error occurs.
To fix this error, please reduce the number of rows in your spreadsheet. If you would like to send more than 10,000 emails, you will have to create multiple spreadsheets and send them in multiple outreach templates. If you would like any help with this, please reach out to your account manager and they can help you.
If you do not have 10,000 rows of information, then it may be that our system is seeing some rows "in use" where the cells may have previously been active. A way to remove this is to delete the rows after your data ends to be sure our system only sees the active cells. Once you have done this, please re-upload the spreadsheet.
If you would like any further help with this error, please reach out to your account manager who will be able to help you.
When error message displays: “Error with upload please try again."
There are a few reasons why this error may display:
- Your session has timed out. You may have started putting together a resident outreach template and you didn't complete the upload of the spreadsheet or press send before your session timed out. If you think this may be the case, then please try going through the process again.
- The spreadsheet you uploaded is too large, such that there may be multiple sheets or images in the spreadsheet that it is making it too large for us to process. Please only upload a spreadsheet with two columns of data, one with first names and the second with the emails you would like to send an email to. Please try re-uploading the spreadsheet.
- There was a loss of connectivity while you were uploading the spreadsheet. If you think this may be the case, please try uploading the spreadsheet again.
If after a few attempts of trying to upload the spreadsheet you continue to get this error, please let your account manager know and they will be able to look into this for you.